Video Editors & Timeline Filmstrips - Part 1

Hi 🙋♂️, I am Aditya. I am full-stack developer from Mumbai. I am a graduate in Software Engineering from Arizona State University. I write about niche technical topics after extensively researching about them so that you don't have to! I breakdown & reverse-engineer complex architecture and workflows so that indie developers could make an informed decision about using them. I also run u/redditspeedbot on Reddit.
Hi there everyone, this is going to be my first blog on Hashnode among many. I like writing about niche topics, and today we will discuss one. Something that I have recently been working on. FILMSTRIPS! and how major online video editors like Kapwing, Clipchamp, Veed, Canva, etc. generate and strategize filmstrips on their editors. Let's begin, shall we?
Filmstrips?
Let's start from the bottom. Filmstrips, what are they? No, I am not talking about spooled rolls that were used in analog cameras a few decades ago but something that is surely inspired by it. Have you ever wandered around on a video editor? If you have then you know that usually, the bottom half of an editor encompasses a "timeline" of sorts. It has a ruler grid looking like a number line at the top and stacks a bunch of rectangular blocks, below it.
These blocks or layers give you minute control over an element's temporal visibility, allowing you to slide or resize them horizontally along a linear number line. This number line generally represents the time in seconds. A layer's length is its duration and its placement signifies an element's start and end times. Something like this!
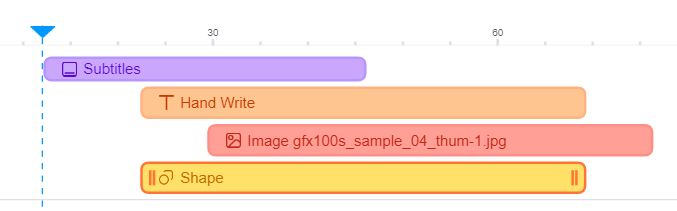
As you can see, there are four layers above, each representing an element of a particular type. The orange layer labeled "Hand Write" is a text layer that starts somewhere before the 30-second mark and ends after the 60-second mark. The same goes for every layer. But if they are just blocks like these, where do filmstrips come in? Wait just yet. You don't see any video layers in the above image. Let me show you what they look like generally on a timeline.
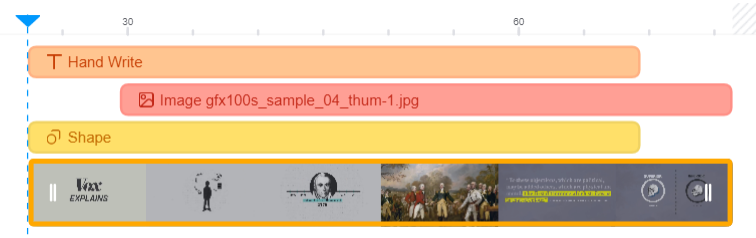
Tada! A video has appeared with a complimentary filmstrip! A series of images stitched side-by-side to represent specific keyframes in a video. Now let's see why.
Why Filmstrips?
How do filmstrips enhance my editing experience? Well, the answer is two-fold.
It makes identification easier. Due to the frames of the video appearing on the layer, you instantly know which video layer you are working with—no need to look for names, serial numbers, etc.
Secondly, trimming & splitting! If you split a single long video into multiple parts, you know which part is what just by looking at the frames. It makes the re-arrangement of such layers a breeze.
Now that you know how resourceful these tiny strips of images are, I want to share how major video editors make and utilize them on the web.
Filmstrips, The How
The million-dollar question! If a developer like myself is tasked to make a filmstrip and make it work on a timeline like this––what would I do? Before I answer this, let me tell you how native and online applications differ in this respect.
Native Video Editing Applications
For context, a native application is built specifically for use on a particular platform or OS. These are standalone applications that directly run on your computer. Some of the well-known examples are Adobe products like Premier Pro or others like Final Cut Pro and iMovie. Any apps installed on your mobile devices are also native, such as Inshot or Lumafusion.
Online Video Editors
If something claims to be "online" or "on the cloud" and is not already an application on your device, where would it be? That's right, your browser. Let's talk about what browser-based video editors like Kapwing, Clipchamp, Veed, etc. have to do differently to create and manage filmstrips.
Creating a Filmstrip
A simple way to create a filmstrip out of a video is to use FFmpeg and execute a simple command. For context, FFmpeg is a well-known open-source project for processing multimedia files. It exists primarily as a command-line tool and is extremely powerful.
Installing FFmpeg
To install FFmpeg, you download it from their website. https://ffmpeg.org/download.html
Mac users could alternatively type brew install ffmpeg in their terminals.
The Magic Command
If I wanted to make a filmstrip consisting of 1 row and N columns with a frame extracted every 800 frames, a simple command like below could generate it in a second.
ffmpeg -i input.mp4 -frames 1 -vf "select=not(mod(n\,800)),scale=100:-2,tile=10x1" output.png -y
I'll explain this command.
-i signifies the input file.
-frames 1 tells FFmpeg that even though I am requesting multiple frames to be extracted, I want only 1 image as an output.
-vf is defining a "filtergraph". A bunch of filters is applied to the input.
select=not(mod(n\,800))signifies selecting one frame every 800 frames.scale=100:-2is scaling down every frame to 100 pixels in width and the height to the respective ratio, but keeping it a multiple of 2, hence the -2.tile=10x1means layout extracted frames in this grid. It also tells that there are only 10 frames to be arranged in that grid. FFmpeg unfortunately needs an exact number for this grid. It can't keep laying it out till there are frames to be extracted. Instead, you can find the number of total frames that exist in a video and give a number based on that.
-y Override any existing output file.
And this is what your filmstrip would look like. Just take this and place it over a video layer and you are good to go.

You can also use the same logic to make a 5x5 mosaic out of it.
ffmpeg -i input.mp4 -frames 1 -vf "select=not(mod(n\,300)),scale=100:-2,tile=5x5" output.png -y

'Tis only the Beginning
If generating a filmstrip is so simple, why should online editors specifically fuss over it? Because FFmpeg runs on a command line that essentially uses the resources of an OS. But I can do all this on a server and just send the image back to the browser right? Of course, but that's when the cracks start showing. Will the user be waiting for the filmstrips to generate every time? What if the user trims a video layer, can the filmstrip show the correct frames? Is there a way to generate such frames in the browser itself? It's just the tip of the iceberg.
But like I said, browsers are incredibly advanced, so of course they have a solution to all of these problems. You just have to tweak the delivery a little and add a bit more spice. I'll discuss all these techniques and reverse engineer major video editors like Kapwing, Clipchamp, Veed, WeVideo, Canva, etc. to show how they achieve filmstrips individually in the next part!
Read the next part here 👉 Video Editors & Timeline FIlmstrips - Part 2
Credits
Cover image by Freepik
Timeline layers images 1 & 2 were created on Veed.io
Filmstrip & Mosaic was created out of https://youtu.be/ZwzY1o_hB5Y


