

This will be the final part of the series where we explore what workflows are possible to achieve a complete implementation of filmstrips. If you have not read the previous parts, you can read them here.
✨ Part 1 - What are Filmstrips and how to generate them?
✨ Part 2 - How do video editors place filmstrips on timelines?
Let's begin!
The Constraints of "Online"
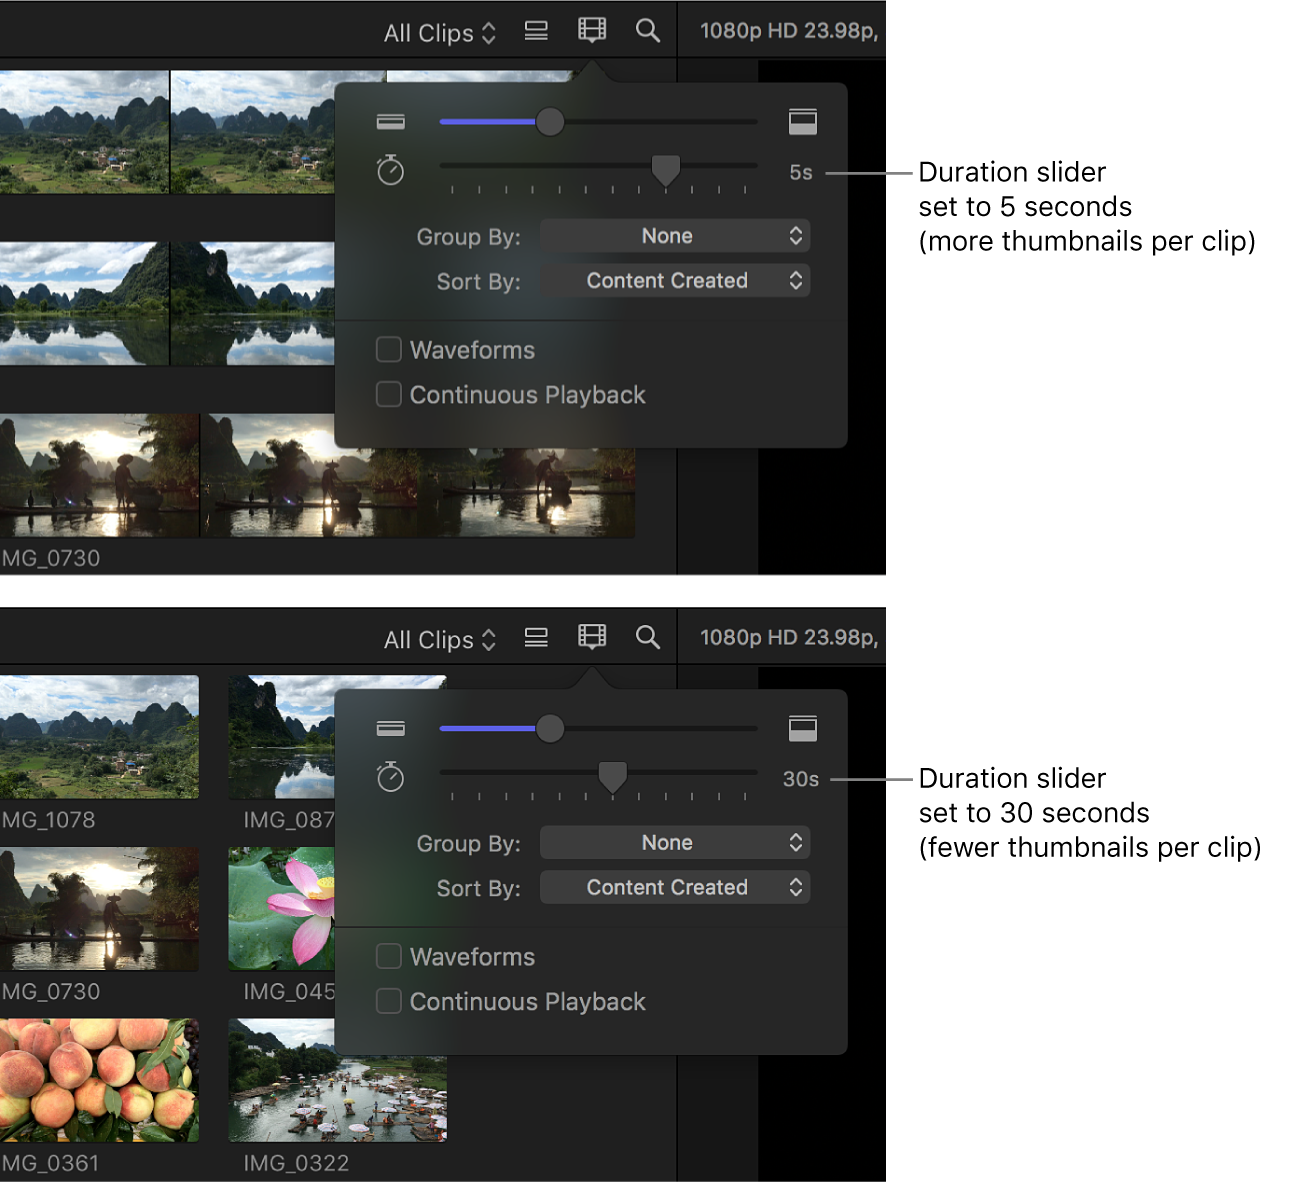
Before we begin, let's see what challenges online video editors face while competing with native applications. Since native applications have direct access to the file system and run on the OS they have instant access to every file (that the user allows them to access). With complete control over files, native applications can extract frames from videos in a jiffy. They can extract how much ever and whenever without any performance jitter at all. They can place every single frame of a 2 hour-long video side-by-side in a second if they wanted to. That's the amount of processing power and data flexibility they possess. See how Final Cut Pro can give options relating to the intervals of frames to display.
Why can't we do this with online video editors as well? Let's see.
Internet Speed
We know how the internet varies for everyone; by speed! Someone with a fibre connection can get a gigabyte of data in a second but there are people out there working with 10 megabytes per second of data as well. This means for the same file there are different wait times for different consumers; introducing a time constraint.
Limited Data
I also want to point out that many consumers are on limited data based on how internet plans in their regions are priced; they can't keep using data as they will. Once they run out of their allotted data, their internet speeds are dropped to the lowest possible speed that can pass as alive but good luck trying to get any data from it. This introduces a constraint on the amount of data downloaded.
Workflows
There are levels to which you can either choose to handle or ignore these problems. Let's start with the workflows and you'll understand them. There are 4 major types of workflows adopted by online editors:
Backend-only approach
Backend & Faux Frontend approach
Backend & Frontend approach
Frontend-only approach
Backend-only approach
This is the most straightforward approach. We learned how to generate filmstrips in the first part. Video editors use servers to generate them behind the curtains. As soon as they are generated, they send it to the browser and fill it on the timeline layer using techniques we saw in the second part. Till that moment, the timeline is going to be empty. No filling the time gaps, nothing.
Backend & Faux Frontend approach
In this approach, editors try to fill the time gap which it takes to generate filmstrip. They do this by extracting a single frame on the frontend and using it repeatedly as a filmstrip till the real filmstrip arrives. But how do they extract it? You can do it using the canvas element. Let me show you a snippet.
const generateVideoThumbnail = (src) => {
  return new Promise((resolve) => {
    const canvas = document.createElement("canvas");
    const video = document.createElement("video");

    video.autoplay = true;
    video.muted = true;
    video.src = src;
    video.crossOrigin = "anonymous";

    video.onloadeddata = async () => {
      let ctx = canvas.getContext("2d");

      canvas.width = video.videoWidth;
      canvas.height = video.videoHeight;

      ctx.drawImage(video, 0, 0, video.videoWidth, video.videoHeight);
      video.pause();
      const dataUrl = canvas.toDataURL("image/png")
      const blob = await (await fetch(dataUrl)).blob();
      const blobUrl = URL.createObjectURL(blob);
      resolve(blobUrl);
    };
  });
};
Now, what's happening here?
I made a function generateVideoThumbnail which can get you the first frame of a video. Inside the function, I make a canvas and a video element, I set certain properties of the video and attach the onloadeddata listener to the video.
Why onloadeddata ? Because onloadeddata will trigger only when the first frame of the video has been fetched. Now that I know that the first frame of the video is loaded, I need to get this frame in an image form.
I get the image URL using the canvas element. You can draw the entire video inside the canvas using the drawImage function and then ask the canvas to get the URL of what it painted by using the toDataURL function. And there you go!
You have the first frame of the video in a URL. But this URL is going to be huge since it is a base64 URL which means it contains all the data of the image. But I can instead make a URL which only points to this data. For this, I convert it to a blob and generate a blob URL.
I can place this URL as the background-image of a div element and use the background-repeat property to show if infinitely. Like this.
background-image: url(BLOB_URL);
background-repeat: 'repeat-x';

Backend & Frontend approach
We've seen what the Faux Frontend approach is above by using only one frame to fill the time gap. But if you want the user to have a peak editing experience, you can extend the faux approach by actually extracting all the relevant frames just like it is done by FFmpeg. To get all frames, you need to download the entire video before you can start extracting frames out of it. To do that you have to download the video using fetch() and then make a blob URL out of it. Like this.
const getBlobUrl = async () => {
  const blobUrl = URL.createObjectURL(
      await (await fetch(YOUR_VIDEO_URL)).blob()
  );
  return blobUrl;
}
After this, you can extract frames by altering the code for generateVideoThumbnail() a little. Like this.
const generateVideoThumbnails = (src) => {
    return new Promise((resolve) => {
      const canvas = document.createElement("canvas");
      const video = document.createElement("video");

      video.autoplay = true;
      video.muted = true;
      video.src = src;
      video.crossOrigin = "anonymous";

      const frames = [];

      video.onloadeddata = async () => {
        let ctx = canvas.getContext("2d");

        canvas.width = video.videoWidth;
        canvas.height = video.videoHeight;

        video.pause();

        /**
        * For loop here!
        */
        for (let i = 0; i < 10; i++) {
          video.currentTime = i;
          ctx.drawImage(video, 0, 0, video.videoWidth, video.videoHeight);
          const dataUrl = canvas.toDataURL("image/png");
          const blob = await (await fetch(dataUrl)).blob();
          const blobUrl = URL.createObjectURL(blob);
          frames.push(blobUrl);
        }

        resolve(frames);
      };
    });
  };
In the above function, I have just changed the part where we get one frame by putting it inside a for loop to seek and push frames to an array. At the end of the loop, I have an array with all the frames.
You can use these frames to place them on the timeline layer till the real filmstrip arrives and voila! You have peak editing experience where the layer will always have a filmstrip on it!
Frontend-only approach
Since you now know how to extract frames using Javascript, you can entirely skip the backend process of generating filmstrips and just do it on the frontend. But you have to keep in mind a few things.
To extract frames you need the video to be readily available. That means you have to download the video every time a page is refreshed, putting limited data users at stake. You can optimize this by implementing a good caching strategy for video files.
I also want to say that generated filmstrips are always easier to cache though. Since they are going to be a few megabytes at max, you can save plenty of cache room.
My Preference
My personal preference would be the Backend & Frontend approach since in the first use I can make frames out of the video file directly since the user just uploaded it and I don't have to download anything. Concurrently, you generate the filmstrip for future use such that when the user refreshes the page, I only have to download the generated filmstrip.
Conclusion
It has been a long journey but we have explored filmstrips in online video editors thoroughly. I hope all my readers got to learn something new about video editors and filmstrips. And for those developers who want to implement their version of filmstrips, I hope all these points helped you make an informed decision to implement filmstrips in your editor.
Thank you! 😄
Credits
- Cover Image by Rochak Shukla on Freepik