


You might think that making bot accounts on Telegram would be difficult. But with a little programming, it is incredibly simple. This is the most concise guide for making a Telegram bot in 3 easy steps. Let's start!
First: Telegram has a bot that makes a bot for you

Search for BotFather.
Type
/newbot.Type a name (display name) for your bot.
Type a username (id) for your bot.
It gives you an auth_token that you must keep secret. This token gives ANYONE absolute access to your bot. So keep it safe.
That’s it. You can search for your bot now. Type your bot’s name in Telegram’s search and your bot should show up. Press on start and now you can send messages to the bot. But where will these messages go?
Second: Setup a server for your bot (no need to leave your browser)
We'll use a website called Glitch which creates and gives you a tiny server for free. It has amazing templates and is a great starting point!
Go to https://glitch.com.
Log in and make a new Express project.
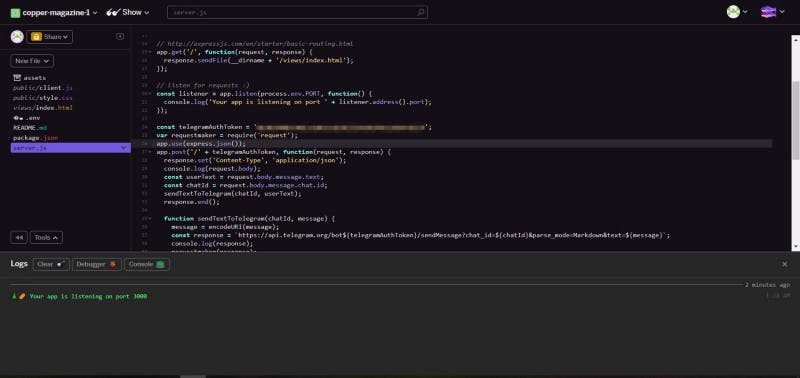
When the editor opens up go to server.js. This file is responsible for handling all incoming messages.
Append this code to the end of the file. (I'll explain this code below).
const telegramAuthToken = '<auth_token>';
var requestmaker = require('request');
app.use(express.json());

app.post('/' + telegramAuthToken, function(request, response) {
    response.set('Content-Type', 'application/json');
    console.log(request.body);
    const userText = request.body.message.text;
    const chatId = request.body.message.chat.id;
    sendTextToTelegram(chatId, userText);
    response.end();

    function sendTextToTelegram(chatId, message) {
        message = encodeURI(message);
        const response = `https://api.telegram.org/bot${telegramAuthToken}/sendMessage?chat_id=${chatId}&parse_mode=Markdown&text=${message}`;
        console.log(response);
        requestmaker(response);
    }
});
Make sure you replace <auth_token> on the first line with the one you received from BotFather. (Refer to the image below).
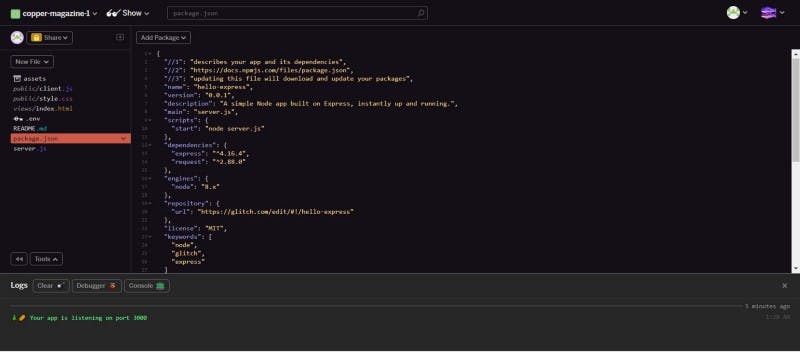
5. Now go to package.json and in your “dependencies” add this line.
"request": "^2.88.0"
It should look like this now.
6. Now click on Tools on the bottom left and click on Logs. You should see this.
Your app is listening on port 3000
That’s it. You have a server ready for your bot!
Explaining the code
If you have a basic understanding of Javascript and ExpressJS you could see that Glitch already provides us with a listener that listens on port 80 as 3000 by default.
Now, what should happen when a request comes on this port? For that, we have to check with what route the request has come. If it is a POST request with our bot’s auth_token as a route we have set up our function.
Wondering why your auth_token is set as the route? It’s because it is secret and unique and we will know that all requests are coming from our bot only and not anyone. (Telegram suggests it).
Explaining the function sendTextToTelegram()
Telegram allows us to communicate with our bot using GET requests. That is typing a simple URL in your browser with your bot’s auth_token, chat_id, and message will send a message to that particular chat (or person or group) from your bot.
That’s what I have done. I passed chat_id and message as parameters to my function and it made a GET request. (This is why we added request in dependencies).
Third: Link our bot and server using webhooks

Install Postman (A tool that can make web requests).
Click on New and then Request.
Type any name and add it to any collection. (Make a collection if one isn’t present).
Now set the request type to POST and type this for the request URL
https://api.telegram.org/bot<auth_token>/setwebHook
We are calling the setwebHook route of Telegram API.
5. We need to tell Telegram where to send our messages. For this, we need the domain name that Glitch gives us. It is
https://your_glitch_project_name.glitch.me
Set the body type as raw and from the drop-down select JSON. Set the body of the request as
{
    "url": "<glitch_url>/<auth_token>"
}
6. Hit Send. You should get a response like this.
{
    "ok": true,
    "result": true,
    "description": "Webhook was set"
}
You are all set!
Your bot is ready. Now when you send a message to your bot it will reply with the same message you sent. That’s it. Now you can code whatever you want on Glitch to manipulate your reply message. I made a Tiny Thesaurus that in the end looked like this.
Bear in mind that this tutorial is just to get you started and does not dive deep into either the Telegram API or proper coding practices. That all should be done according to your convenience.
Here’s the API reference to routes and parameters made available by Telegram. - core.telegram.org/bots/api
Thanks for reading!